

Create a Candle Flame
1 Material, Easy to set up, no sprite sheets | UE4

All of the tutorial's resources can be found here.
Here is a unique way to create a good looking candle flame in UE4. Done with just one material and optionally one Niagara particle system.
Final Result
Before we begin, take a look at the final result:

Textures
You just need 2 grayscale textures:
Candle flame mask
Noise
The candle flame mask should be a grayscale texture with the shape of a candle flame. The edges should be a bit smoother and the lower end should have a gradient to transparent.
The noise is a simple Perlin noise, used to deform the flame shape. Here are the textures I created. Feel free to use the texture used in this tutorial.
Material
The candle flickering is achieved through UV distortions, which omits the use of sprite sheets. Resulting in less work and better possibilities to apply changes in real-time.
Settings
Changes to do:

Blend Mode:
Set the blend mode to additive.
Why:
Additive blend adds the pixels of the material to the pixels of the background.
This is useful for fire effects since there is no darkening of the base color.
Shading Model
Set the shading model to unlit.
Why:
The unlit shading model only outputs emissive. This is perfectly suited for fire. We don't need other outputs like base color, roughness, etc.
Implement the candle flickering
To create the flickering of the candle, we need to distort the UV’s of the flame texture:

In the first step (red), we use a Panner node to create a “movement” of the noise texture. Notice how there are two different noise tilings. One is stretched, and the other is not.
The stretched one gives the flame a more basic movement, while the other adds more details to the flame itself.
In the second step (yellow), we append the two noises together and define an overall strength for the noise.
After this, the texture coordinate of the flame is added to the distortion.
To correct the location of the flame in the UV space, a constant of 0.3 is added to the distortion.
Combining the material
The rest of the material is just putting together. Also, add a Particle Color node which is needed for the next step:

The Particle System
The last step is creating the particle system using Niagara.
Steps:
Create a new Niagara System named “Candle”
Add a new Emitter from type Fountain
Delete the following Modules from the emitter:
Calculate Size by Mass, Sphere Location, Gravity Force, Drag, Scale ColorAdd a Color module and a Set Variables module for the SpriteSize under the Particle Update section
It should look like this:

5. In the Sprite Renderer section, select the candle flame material. Also, change the Facing Mode to Face Camera Position. This will lead to a more realistic look as the flame will not rotate directly to the player, if you watch it from the top.

6. Set the spawn rate to something more than 30. Too low values will result in flickering.

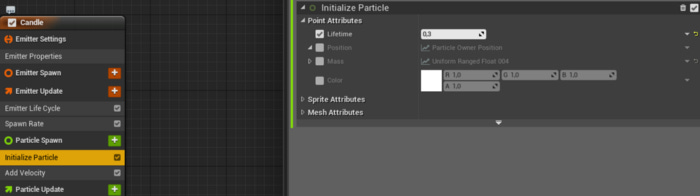
7. Depending on how stretched your flame should look, set the Lifetime around 0,3.
8. Use a ranged vector to define the velocity. Adding a speed difference between single flames will improve the look.

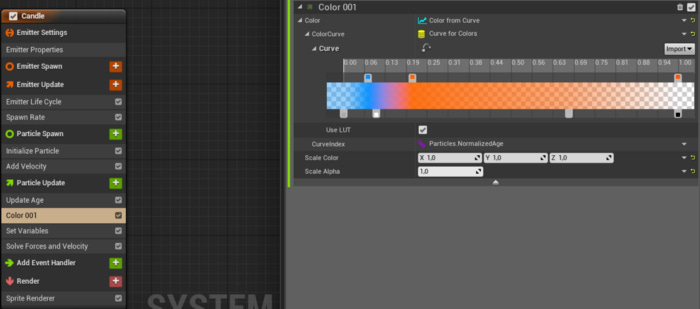
9. Add a color curve.
10. Use a curve to scale the flames down over time. With the ScaleCurve parameter, you can change the width and the height of the flames.

11. Place the Niagra system in the world.
This is all you need. You can also omit the particle system and let the material handle the flames' rotation and color. This will be explained in a later tutorial.
For now, enjoy your candle flame!
Thank you for reading this article from GameInspired.
Do you have any questions, critiques, or ideas you want to have discussed in a post? Please don't hesitate and reach out to me: gameinspired.mail@gmail.com