
Creating a minimap in the unreal engine is pretty simple and straightforward. This is the first part of the Minimap/Map tutorial. You will learn how to create a basic map using sceneCaptures2D and renderTargets.
After the last part, you will have an interactive minimap, which will be able to interact with the world.
Without much talking, let’s start with the basic minimap setup!
Setting up the minimap
How it works
The way the minimap works is through a sceneCapture2D object, which captures a defined area of the map and renders the captured area to a renderTarget. The renderTarget will be used in a material that can finally be applied to an object.
RenderTarget
Create a new renderTarget. You can find it under the Materials & Textures section.

Double click the render target and change the size to 1024*1024 to get a higher resolution.

That’s it for the renderTarget.
The minimap material
Create a new material, drag your render target into it, and connect the Base Color input with the Texture Samples RGB input.
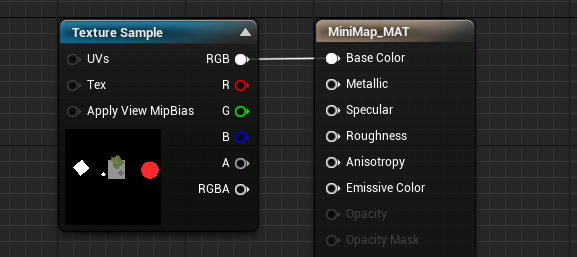
This is sufficient for now. We will return here later.
The minimap actor
If you just want to render your minimap to an object you can skip this step and instead apply your minimap material directly to a static mesh.
Create a new Actor, called Minimap or similar.
Add a new static mesh component and apply a mesh that is suitable for a minimap. In this example, I use the plane mesh from UE4’s basic shapes.


Now, we need to apply the minimap material to the mesh.
To do that, we will create a dynamic material instance from the minimap material and apply it to the mesh. This is necessary for later interactions, you will see why.

Select the minimap material as the parent input on the Create Dynamic Material Instance node.
Save the material instance to a new variable and apply it to the minimap component using the Set Material node.
Drag the actor into the world, and you are done!
Setting up the sceneCapture2D
To create a new sceneCapture2D object in your game, search in the Place Actors tab for SceneCapture2D and simply drag it into the world.

Rotate it in such a way that it directly looks down on the world, to get a top-down view.
In the details tab under Scene Capture, you will see the Texture Target field. Select our created renderTarget here.
Also, change the Project type to Orthographic.
With the Ortho Width parameter, you define the area which is captured by the SceneComponent. Change it depending on your map size and your needs. In this example, I am using an Ortho Width of 10000.
Finally, you should see the capture of the SceneTexture on the minimap actor. This is the basic setup for the minimap.
Here is the current state of the map in action:

Yeah I know, it looks a bit weird. So let’s improve a bit!
Visual improvements
Depending on your project you want to have a different design of the minimap. Here are some basics on how to modify the minimaps display.
A key setting here is the Capture Source for the sceneCapture2D:

Here you can choose what data will be saved to your render target.
Often, minimaps should not display the world’s lightning. To achieve this, you can either choose the BaseColor in RGB (Deferred Renderer only) option from the dropdown. Or you can uncheck the Lighting option under the Hidden Show Flags tab.
I would recommend unchecking the Lighting option because the BaseColor in RGB setting does not write the Opacity channel.
Furthermore, you can manipulate the minimaps looks in the material. Here you have all the power you want. Be creative!
How about a translucent background?


Or a more abstract way to visualize the map?

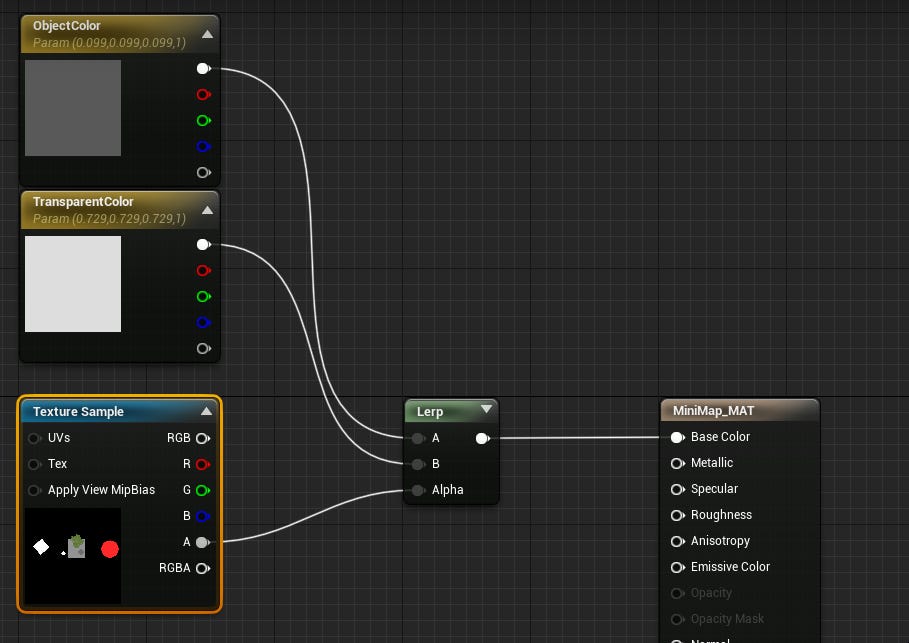
These are just simple examples of want you can do. In the next tutorials, we will spend more time on the material, so stay tuned!
Next steps
In the next tutorials, we will learn how to stick the minimap to the player and apply it to the player’s screen.
Furthermore, we will learn how to interact with the world through the minimap.
If you haven't subscribed already, make sure you do to never miss out on any content! There are no costs, and you can quit whenever you want.